Install Windows 7 and Windows XP Sp2/Sp3 Using USB Flash Drive Compile By: CodeCatcher
Its Hard To Format a Laptop or Desktop Computer with No CD/DVD Drive on board installed or even built in CD-ROM but not working. So i Sta...
https://iskablogs.blogspot.com/2011/09/install-windows-7-and-windows-xp-sp2sp3.html
Its Hard To Format a Laptop or Desktop Computer with No CD/DVD Drive on board installed or even built in CD-ROM but not working. So i Start a research again on web and find a way how can i solve this problem with out using CD/DVD Drive, or can i use USB Flash Drive instead of Boot to CD. after trying many time of errors i had come out a solution, at last i found the best solution and easiest way to format a no CD/DVD Drive Computer and laptops.
Requirements:
USB Flash Drive Not least that 1G
for Windows XP , 4G for Vista and Windows 7
Computer With CD/DVD Room To Mount Your Windows Image Setup Installer
If you don't Have CD/DVD On Board you can use Power ISO Software
And the Most important is WinToFlash Software
To Transfer your Windows Installer to USB Flash Drive.
Download WinToFlash: Here
Or Visit the main source for latest update and patch Here
Download Power ISO: Here

Visit The Link To download Windows XP SP3 Installer CD If You don't have.
Here's the Steps:
1. Insert your USB Flash Drive or Pen Drive
2. Insert your Windows Installer CD in CD/DVD Room
If you Don't have CD/DVD Drive Open Power ISO Mount your Image to your Specified Drive
3. Extract WinToFlash in Any Directory, Open WinToFlash.EXE.
Click Next..
Click Welcome TAB and Click the Check Button to Proceed
Check the option "Always Start in Wizard Mode" Then Click Next..
Select Your Windows File Path "CD/DVD Drive or Virtual Drive" using Power ISO Make Sure you Mount the Setup Installer inside. then Click Next after you Select the target path.
Select Your Target USB Drive "Your Flash Drive" Then Click Next..
See The Correct Format of Drive Letter of your Windows Path File And USB Drive
Follow the Image Figure Above to find free File key inside of Win2Flash Folder
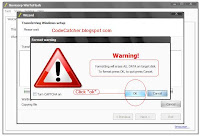
Accept the Term and Click Continue to Format your Flash Drive..
Warning all your Data Will be lost in the target USB Flash Drive
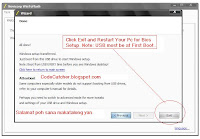
Click Next To Exit Setup
Click Exit and your Done..
After Restart Go to Your Bios Setup By Pressing "F2" or "DEL"
Go to you Boot Disk Priority, Select USB Flash Drive as
Your 1st Boot Priority. Save Changes and Exit Bios..
Follow the image Figure above in Dos Mode.
On how to Format, Using arrow keys UP and Down.
In First Boot:
Please Select 1st Step, Follow the Format Instruction in (Text Mode)
After Format Computer Will Restart.
In 2nd Boot:
Press Down And Select 2nd Step in
Where Windows XP Installation Setup in (GUI Mode.)
In 3rd Boot:
Or Every Time You Restart your computer you will see a message tells you to select either "Microsoft Windows" or Windows (default). If you dont want to wait or bypass this boot message you can edit the file in "c:\" Directory and find the file name "boot.ini" file.
To view and manually configure the Boot.ini file in Windows XP from within the Startup and Recovery Dialog.
1. First Open Folder Option
2. In Folder Option Click View Tab
3. In Advance Setting Find the 2 line and Unchecked
4. "Show hidden Files and Folders"
And "Hide Protected Operating Files (Recommended)"
5. Now Go to C:\ Directory and Find the boot.ini File
6. Right click The File and Unchecked the Read-only Attributes click Apply Then OK
7. Now You Can Edit boot.ini File, use the code below.
" Copy This Code and Paste"
[boot loader]
timeout=30
default=multi(0)disk(0)rdisk(0)partition(1)\WINDOWS
[operating systems]
multi(0)disk(0)rdisk(0)partition(1)\WINDOWS="Microsoft Windows XP Professional" /noexecute=optin /fastdetect
8. Save your boot.ini File.
Note: Make Sure you Delete all the recent code before you paste the above code.
For PEtoUSB Guide on how to Format Windows XP Sp2 Pro
using USB PEN Drive Visit: Here.And Step-by-step Guide on how to Format a Fresh copy of Windows XP Using Bootable CD Here
If You Don't Have Any ISO IMAGE FILE of Windows XP on Your Own. You can try and Download Windows XP SP3 Bootable ISO File for Free: Here
Note: Download All 7 Parts of Windows XP SP3 ISO IMAGE FILE Package then click the Exe file archive which is Part 1. Remember there's a Password on it.. Password written in my name as codecatcher.
More Tags: Angry Bird, Blogger, Fate , Plants Vs Zombie, Special Force, Point Blank, Ai Maps, Deep Freeze UnFreezer, Ninja Saga, Deep Freeze, Samsung SGH, Guitar Pro, USB XP Install, Yahoo 443 Problem, Turtle Odyssey, GTA San-Andreas, PlayStation, Tips Tweaks Tricks, HTML, Facebook, Animated JPG, Counter-Strike, USB Windows Format, Screensaver, USB Security.


